
Washer Tub and Suspension Repair
 Tools you may need:
- Phillips Head Screwdriver
- Flat Head Screwdriver
- ¼” Nut Driver
- Hammer
- Ratchet with ½” Socket
- Spanner Wrench
- Pliers
In this article we’ll be examining the tub and suspension system of a Whirlpool built top-load washing machine repair. How it works, how it can fail and how you can repair it.
To remove the tub ring, press down on each of the side clips and pull. There is a seal on the inside of this ring to keep splashing and small amounts of water within the outer tub. This is called a spanner wrench. It is necessary if you are going to replace the inner tub or any part of the main drive system. A spanner wrench is the one specialty tool needed to replace this washer.
There are four pins that insert down into four notches on the spanner tub ring. Use the wrench to grasp the tub nut and hammer in the counter-clockwise direction to remove. Be careful not to hit the inner tub with your hammer or the porcelain coating may chip and allow rusting.
Completely remove the spanner ring, and then remove the tub by lifting it off of the hub that the spanner ring was attached to. If the tub is rusted to the hub, press down quickly on the outer rim of the tub at several points to free it. Be cautious not to break the fill spout while you’re lifting the tub free. It’s helpful to push back on the back panel with your elbow as you lift.
The inner tub has a balance ring attached to the top that is filled with liquid to counter-balance the tub in case of an off balance load. A properly loaded tub needs to be at least half full and with similar items. If you try to spin one large towel you will have issues. The hub is the part that holds the inner tub to the drive tube. Remove the hub from the drive tube by striking it from below.
Now, from the bottom of the washer we will remove the transmission.
Remove the three half inch bolts that attach the transmission to the washer frame. These machines have a lot of sharp edges so it’s a good idea to use some kind of an extension to your ratchet to keep your hands out of harms way.
Next, remove the wiring harness from the side valve by squeezing the back of the clip with a pair of pliers. Now pull the transmission straight out from the drive tube. If you are pulling straight it should slide out fairly easily.
Now let’s take a look at the suspension system in action. The tub rotates at 500 revolutions per minute, so if you are using this technique make sure that you are clear of all moving parts.
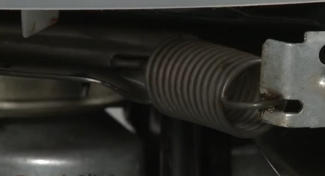
When I release the lid switch, the washer’s brake will engage. The suspension springs, that we will look at next, restrain the tub from pivoting too far and striking the inside of the cabinet. These springs are responsible for controlling the tub’s lateral motion and keeping the tub in a central position while allowing for some movement to absorb the tub’s energy. These springs are made of spring steel, so it’s highly unlikely that they will stretch out. More commonly they will snap in two pieces or become detached from their mounting points for some reason.
This is the rear suspension spring. It keeps the tub close to the rear spring and keeps it from tipping too far forward. This is the more common issue that is experienced. The spring will rarely break or stretch, but it will tend to rust through the lower part of the frame and become detached. If it is loose the tube will sit far too far forward and can causing leaking during the fill. The fill spout will actually miss the tub completely and dump water down the back of the washer.
Also, during the spin the tub is more likely to become off balance. In order to solve this problem either replace the spring in the case of it breaking, or in the case of a rusted frame just simply drill a new hole next to the old one and reinstall your spring.
Part 2
In order to remove the tub and access the tub seal, we are going to need to remove all of the tub springs. The springs are attached to the tub with a bar that stretches the springs to the proper tension.
To remove the springs hold the end of the bar with your thumb and forefinger, keeping tension on the bar so that it doesn’t fly off when you remove your ¼” screw. Once you have the screw out, carefully allow the bar to lift out of the tub mounting blade. The bar can be used for leverage to reinstall these.
This is a handy trick I can show you to better be able to access the rear spring bar. Disconnect the pressure switch hose and flip this tab at the back of the base panel to allow the back of the washer to tip back and give you more room to work.
This is the rear tub spring that we just talked about. Once you have all the springs detached you can remove the outer tub. This plate cradles the tub on three points of contact with these base pads and should slide easily on the top of the base pads mounted on the lower tripod frame.
The three point of the slide point triangle should line up with the three legs of the lower tripod. The lower tripod frame supports the tub and all the washers’ major mechanics. Any distortion to any one of these three main frame legs can cause weakness and vibration. The three base pads on the plate should make contact with the three flat sides of the tub support frame. And the connection hose to the hub needs to be facing the front of the washer. With the system of two points of contact the base of the washer can move very well on both axes much like a shoulder or hip joint.
Now that we have the outer tub free, you simply flip it over and pull the tub support frame out of the tub seal. A lot of these edges are very sharp so I definitely recommend these gloves when doing this.
Gently rock the frame piece from side to side as you pull. Now you’re easily able to replace the tub seal. You also want to examine the tube portion that makes contact with the seal and look for rust or pitting of any kind that may cause the new seal to leak.
When you’re reinstalling the tub reattach all of the suspension springs. For the rear spring, you can attach the bar first and then set the spring afterwards. For the side bars, set the bar cleat into the first hole on the side that is attached to the suspension spring. Use the bars’ leverage to tension the spring.
Again, pinch the end of the bar with your thumb and forefinger while you rethread the ¼” screw into the tub support. The most common cause of an off balance load is an unbalanced washer. Whirlpool built washers have rear self-leveling legs that should adjust to the slope of the floor when the washer is lifted. This, with properly leveled and locked front legs, will solve many balance issues.
Over time the rear legs can become bound up with rust and this usually can be corrected by simply striking the legs upward with a hammer breaking away any rust, also lubricating with some household oil or spray.
A few things to remember:
- A broken rear suspension spring will allow the tub to move too far forward.
- Suspension springs almost never the cause of an off balance spin cycle.
- To replace the inner tub remove the cabinet, agitator, and tub ring.
- Make sure the washer’s legs are level and the frame is not bent.
